Dette er en gammel revision af dokumentet!
 This page is not fully translated, yet. Please help completing the translation.
(remove this paragraph once the translation is finished)
Back to Rustrips
![]()
How-to-LaTeX
There are a lot of advantage when using LaTeX for writing your playbook. LaTeX has a lot of awesome commands and macros that makes writing your playbook a lot easier. Simpply LaTeX is just beautifull. This section will cover a lot of basic LaTeX commands that are relevant for writing your playbook. It is expected that the reader has a basic understanding of LaTeX or at least has gone through this 30 min tutorial Overleaf.
We highly recommend that you write on Overleaf. One of the big advantages to using Overleaf is the ability to write simutationally like in google docs. Everyone has access to the playbook and can write at the same time. Overleaf even includes versioncontrol that enables you to quickly find a previous revision of the document if need be.
Basic setup
For efficiency's sake it is a good idea to split your LaTeX document into smaller files — as you would any other big LaTeX project. It is recommended to use one of the premade playbook templates. We have made 2 versions that uses 2 different methods for splitting the document into smaller parts. The first is one made with the subfiles which has the advantage of you only having to compile the working document and not the whole playbook. The \input{} version is a much more simple solution however when compiling the document you have to compile the whole playbook. For at playbook of 20-30 pages it might not matter too much to use the more simple solution however for a playbook of 50+ pages you waste a lot of time compiling.
The templates is already split into days, activities and general stuff
fig
latex
  back-matter
  days
  front-matter
  settings
main.tex
New page
The method of which you add a new page / activity to the playbook depends on which template you have chosen.
Subfiles
The template uses the subfiles package to easily split the document into smaller managable pieces.
When compiling a subfile in LaTeX you only compile the working document and not the whole playbook
which would take a long amount of time. To actually compile the whole document you need to compile the
main.tex document.
The \subfile{} commands works by using the first parameter as the path to the file to add to the document.
Therefor you write this command in the main.tex document if it is from the front- or back-matter.
If it is an activity corresponding to a day you add it to the day's corresponding .tex document. Here
is a breakdown of how busride.tex from day 1 is added:
First we have created the document latex/days/01_arrival/bustur.tex:
\documentclass[../../../main.tex]{subfiles}

\begin{document}

 % Information about the busride

\end{document}
Take notice to how the documentclass is defined. The number of ../ corresponds to how meany levels of folders
you have to go from latex/days/01_arrival/bustur.tex to main.tex which is at the top. Here there are 3 folders
we have to go through to get to main.tex hence 3 ../ in \documentclass[../../../main.tex]{Subfiles}.
Because it is an activity of day 1 we add it to latex/days/01_arrival.tex:
\documentclass[../../main.tex]{subfiles}
\begin{document}

\section{First day}
\subfile{01_arrival/01_timetable.tex}
\subfile{01_arrival/busride.tex}   % <----- busride is added here
\subfile{01_arrival/welcome_speech.tex}
\newpage
\subfile{01_arrival/starrun.tex}

\end{document}
It might seem a bit overwhelming at first to create new documents, but have a look at the template. It has a lot
more examples of how each document is added. We highly recommend using the sufiles version because of the fact
that the playbook is only compiling the working document. For a playbook of +100 pages you waste a lot of time
compiling the playbook if you used the \input{} version. That time you could have used to write the playbook
and sooner be done.
\input{}
I denne skabelon bruges \input{} til at dele drejebogen op i flere dokumenter. For at tilføje en ekstra aktivitet, skal man blot skrive \input{sti-til-din-fil.tex} i enten main.tex eller i den tilhørende dags .tex fil. Her er et eksempel på hvordan bustur.tex er tilføjet til drejebogen
latex/dage/01_ankomst.tex
\section{Første dag}
\input{latex/dage/01_ankomst/01_tidsplan.tex}
\input{latex/dage/01_ankomst/bustur.tex}       % <--- Her er bustur tilføjet
\input{latex/dage/01_ankomst/velkomsttale.tex}
\newpage
\input{latex/dage/01_ankomst/natloeb.tex}
\input{} kommandoen vil nu tage alt hvad der står i bustur.tex og indsætte i drejebogen.
Det skal lige siges, at på samme måde som bustur.tex er tilføjet til 01_ankomst.tex er 01_ankomst.tex også tilføjet til main.tex med \input{} kommandoen.
Code names and colours
The template includes the ability to add a colour to a vectors team and name. This makes it easier
for the vector to distinguish when and where they are responsible for something and when their team
is. To make these open the document latex/settings/code_names.tex and add the command:
\codename{command name}{colour}{name to be displayed}
This could for example be
\codename{\VEKTOREX}{lemon}{Munken}
You would then later in the document write \VEKTOREX to get

In latex/settings/code_names.tex there are also the following examples of different codenames
% KABS
\codename{\KABS}{lightblue}{KABS}
\codename{\KABSEKS}{lightblue}{Rustrip Name}

% VEKTORER
\codename{\VEKTOREX}{lemon}{Niels}

\codename{\ALLV}{mediumpurple}{All vectors}

% BUMSER
\codename{\BUMS}{lust}{Bums}

% TEAM
\codename{\vektorex}{lemon}{Stodderne}
To make it easier for yourself when writing the playbook you should make a system for the study line team and
cross team. For example \niels would be the vector, \nielsS would be the study line team and
\nielsC would be the cross team.
Images
The most simple way of inserting an image in the playbook is with the command \includegraphics{fig/path/to/image.png}
The following is an example of how an image is inserted with a width of 7cm (the height will automatically adjusted) and adding the caption „is placed at the entrance door to Bakkedargest fælleshus, Bakkedraget 30.“
\begin{figure}[H]
  \centering
  \includegraphics[width=7cm]{fig/hjertestarter.jpg}
  \caption{is placed at the entrance door to Bakkedargest fælleshus, Bakkedraget 30.}
  \label{fig:AED}
\end{figure}
A more extensive guide for inserting images in LaTeX can be found here.
Tables in LaTeX
Tables are extremly useful for displaying contact information, rotation table, overview of russes etc. The following tables are examples of how to fill the tables in the playbook template.
If you are not proficient with LaTeX you could use Tabel Generator to fill the tables it might make it a bit easier.
Cross and Study Line tables
When checking russes for the bus trip and the general overview it is important to have tables for which russes are on which study line and cross team. It will also be easier to find the vector of a corresponding rus if they are needed.
We recommend that you do not write these tables directly in you playbook but in a seperate document. There will often be very late rustrip sign ups — even some on the introduction day. If you wrote the tables in the playbook you would have to print out a new list anyways, so it would be much easier to just make a different document and print it the day before the rustrip.
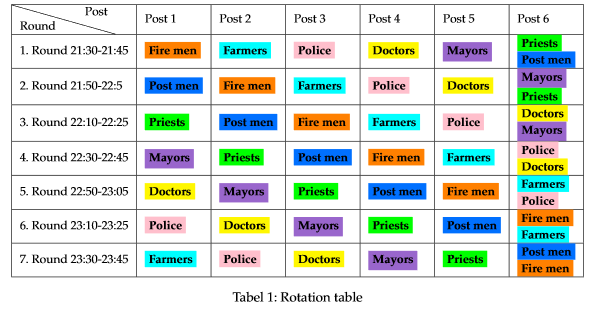
Star run rotation table
Rotation tables are used to find out which teams go where at any given time during the star run. The following is an example of how one might make a rotation table using the playbook template.
\begin{table}[ht!]
\centering\small
\begin{tabular}{|l|l|l|l|l|l|l|} \hline
  \backslashbox{Round}{Post} & Post 1 & Post 2 & Post 3 & Post 4 & Post 5 & Post 6 \\ \hline
  1. Round 21:30-21:45 & \peterC   & \jakobC    & \teodoraC & \nielsC   & \fridaC & \makecell[l]{\melissaC \\ \lineaC }  \\ \hline

  2. Round 21:50-22:5 & \lineaC   & \peterC    & \jakobC   & \teodoraC & \nielsC   & \makecell[l]{ \fridaC \\ \melissaC } \\ \hline

  3. Round 22:10-22:25& \melissaC  & \lineaC    & \peterC   & \jakobC   & \teodoraC  & \makecell[l]{ \nielsC \\ \fridaC } \\ \hline

  4. Round 22:30-22:45 & \fridaC & \melissaC  & \lineaC   & \peterC   & \jakobC     & \makecell[l]{ \teodoraC \\ \nielsC } \\ \hline

  5. Round 22:50-23:05 & \nielsC & \fridaC   & \melissaC & \lineaC   & \peterC     & \makecell[l]{ \jakobC \\ \teodoraC }\\ \hline

  6. Round 23:10-23:25&\teodoraC & \nielsC & \fridaC   & \melissaC & \lineaC   & \makecell[l]{ \peterC\\ \jakobC }\\ \hline

  7. Round 23:30-23:45&\jakobC & \teodoraC & \nielsC & \fridaC   & \melissaC   & \makecell[l]{ \lineaC \\\peterC }\\ \hline
\end{tabular}
\caption{Rotation table}
\label{tab:rotation_table_starrun}
\end{table}
This compiles to the following table
Timetable
It is a good idea to create a timetable for each day with a list of what happends when. The following is an example taken directly from the template.
\begin{tabularx}{\textwidth}{|p{1cm}|X|X|X|}
\hline
\textbf{Time}        & \textbf{Activity}  &   \textbf{Where/Notice/Materials} &   \textbf{Responsible} \\ \hline
\textbf{08:30}      & Vectors meet for breakfast fernet branca and breakfast  & Hos \VEKTOREX at William Demant (Akademivej 100B) & \VEKTOREX and \VEKTOREX \\ \hline
\textbf{09:30}      & Walk to the S-house                 & 101E & \ALLV \\ \hline
\textbf{10:15}      & Russes arrive & 101E, find your crossteam and badge distribution & \ALLV \\ \hline
\textbf{10:30}      & Remind the russes to use the bathroom, might be a long trip & 101E & \ALLV \\ \hline
\textbf{10:45}      & The bus arrives & Russes walk into the bus, \VEKTOREX counts the russes & \VEKTOREX \\ \hline
\textbf{11:00}      & Bus leaves from DTU & Practial information about the trip & \VEKTOREX \\ \hline
\textbf{11:30-13:00}& Bustrip & Speed-dating, jokes, bridge toast & \VEKTOREX \\ \hline
\textbf{13:00}      & Arrival at the cabin & Crossvector shows the team their sleeping accommodations & \ALLV \\ \hline
\textbf{13:30}      & \KABS's welcome speech & Dinning  hall. Introduction of Swamp machine and study start rules & \#RIPBuffalloBill \\ \hline
\textbf{13:45-14:30}& Lunch & Dinning hall & \BUMS \\ \hline
\textbf{14:30-15:30}& \vektorex cleans up after lunch & Free play for everyone else& \VEKTOREX \\ \hline
\textbf{15:30-17:00}& Team Spirit & All over the cabin. Paint banner and make a battle cry for the team & \VEKTOREX \\ \hline
\textbf{16:00}      & New vest shift & \VEKTOREX and \VEKTOREX downs a beverage & \VEKTOREX and \VEKTOREX \\ \hline
\textbf{17:00-17:30}& Cleanup and presentation of banners & The terrace & \VEKTOREX \\ \hline
\textbf{17:30-18:00}& \vektorex prepares dinner & Free play for everyone else & \VEKTOREX \\ \hline
\textbf{18:00-19:00}& Dinner & Where do you think? The dinning hall. Presentation of the gossip box (and memes) & \BUMS and gossip box responsible \\ \hline
\textbf{19:00-20:00}& \vektorex cleans up after dinner & Dinning hall and the kitchen & \VEKTOREX \\ \hline
\textbf{19:30}      & Caos meeting & Caos meeting room  & \ALLV, \KABS and \BUMS \\  \hline
\textbf{20:00-22:30}& Starrun & Plan for the starrun & \VEKTOREX is responsible for rotation \\ \hline
\textbf{22:00}      & SHUT ALL DOORS AND WINDOWS & We don't want to loose our cabin for next years rustrip & \ALLV \\ \hline
\textbf{22:30}      & Free play & Everywhere & \#freeofresponsibility \\ \hline
\textbf{23:30}      & Late night snack & Dinning hall / party room & \BUMS \\ \hline
\textbf{00:00}      & \ALLV stops drinking & \#responsiblevectors \#soberday \#cocioday &  \\ \hline
\textbf{ca. 02:30}  & Throw the Russians to bed &  & Those who haven't died yet \\ \hline
\end{tabularx}
\end{document}
This gives the table:

Tabel til vektorinformationer
Vektorinformationerne er noget af det første der står i jeres drejebog sammen med oplysninger vedr. nærmeste skadestue/hospital, politi, hyttefars informationer osv. Selvom de fleste af jer nok har telefonnumrene på jeres tværvektorer er det vigtig at have dem ved hånden, hvis jeres mobil skulle være løbet tør for strøm eller lignende og i står i en nødsituation.
Nedenstående er et eksempel på, hvordan disse informationer kan angives. De er igen angivet med navne som kodeord. De tilhørende telefonnumre er fiktive.
\subsection{Vores telefonnumre}

\begin{tabular}{c|l}
% KABS
+45 00 00 00 00 & \Niels \\
+45 00 00 00 00 & \Peter \\

% Vektorer
+45 00 00 00 00 & \Teodora \\
+45 00 00 00 00 & \Melissa \\
+45 00 00 00 00 & \Linea\\
+45 00 00 00 00 & \Frida\\
+45 00 00 00 00 & \Jakob \\

% Bumser
+45 00 00 00 00 & \Viktor \\
+45 00 00 00 00 & \Munken \\
+45 00 00 00 00 & \Neel \\
+45 00 00 00 00 & \Matteo \\

\end{tabular}
Et screenshot af koden compilet ser ud som følger:

Hvis din tabel er for stor
Hvis du har en tabel som er for stor til din side, kan du prøve at lægge den ned i „landscape“ mode, altså lægge siden ned. Dette gøres ved at sætte \begin{landscape} og \end{landscape} rundt om din tabel.
\begin{landscape}
   ...tabel...
\end{landscape}
En anden mulighed som kan sættes i kombination med ovenstående er at ændre skriftstørrelsen LaTeX skriver i. Følgende er listen over de standard skirftstørelser som LaTeX bruger
\Huge
\huge
\LARGE
\Large
\large
\normalsize (standard)
\small
\footnotesize
\scriptsize
\tiny
Der findes 2 måder at ændre på skriftstørrelsen i LaTeX
{\small Dette er tekst med en lille skriftstørrelse skrevet `inline'}

\begin{small}
Dette er tekst med en lille skriftstørrelse skrevet i et LaTeX enviroment
\end{small}
Hvis man bare skriver \small i sin kode, vil alt tekst efter ændres til at bruge størrelsen \small indtil dette ændres. De ovenstående måder er 2 forskellige måder at begrænse hvor meget tekst som bliver påvirket.
Flere kolonner
Ofte har man lyst til at give sin drejebog flere kolonner, for at give mere plads til tekst eller gøre ting mere overskueligt. Det kan gøres meget simpelt i drejebogen ved at omringe den tekst man gerne vil have i flere kolonner med \begin{multicols}{X} og \end{multicols}, hvor X er antallet af kolonner. Følgende er et eksempel på noget som sættes i 2 kolonner.
\begin{multicols}{2}
  Denne tekst er nu i 2 kolonner
\end{multicols}
Materialeliste
Matlist
For at gøre materialelisten så simpel som mulig kan man vælge at lave denne i LaTeX. På denne måde vil LaTeX samle alle items på materialelisten for dig. Dette gøres på følgende måde:
Start materialelisten med følgende kommando:
\begin{mats}{DAG}{AKTIVITET}
Herefter skrives alle materialer på følgende måde:
\mat{antal}{materiale}
Når der ikke er flere materialer afsluttes der med:
\end{mats}
Når man gør det på denne måde kommer materialelisten automatisk bagerst i drejebogen og samler det nemt og overskueligt sammen.
Eksempel på en post, hvor mats er brugt:
{\large \textbf{Post 8 - Kassestaffet}} \\
\textbf{Postansvarlig:} \LORD \\

\begin{mats}{Lørdag}{Kassestaffet}
   \mat{4}{Mælkekasser}
\end{mats}

Russerne stilles op på mælkekasserne og skal nu transportere sit hold så langt som muligt uden at røre jorden.

Til sidst i drejebogen, hvor man kan se at den er kommet ind under Lørdag, Kassestaffet:

Eksterne links til hjælp
Det aller hurtigste er klart et søg på Google med dit specifikke problem, Stackoverflow og Wiki-sider plejer nemt at kunne løse de små problemer eller spørgsmål.
- https://www.overleaf.com/learn/latex/Main_Page - overordnet side
- https://www.overleaf.com/learn/latex/Tables - tabeller generelt
- https://www.overleaf.com/learn/latex/Hyperlinks - links og labels
Første udkast lavet af Henriette Steenhoff d. 26-06-2015, revideret af Niels Kjær Ersbøll i 2020